That burnt taste usually shows up at the worst time – halfway through your favourite e-liquid, just before heading out, or when your device was working perfectly yesterday. A proper guide to replacing vape coils at home saves you money, keeps your kit performing properly, and helps you avoid the usual mistakes that ruin flavour or waste a fresh coil.
For most adult vapers, coil changes are basic maintenance rather than a technical job. Whether you use a compact pod kit from OXVA or Vaporesso, or a tank setup from Geekvape, Voopoo, Uwell or Aspire, the process is usually quick once you know what to look for. The key is not rushing it. Most coil problems after replacement are caused by fitting the wrong coil, filling too soon, or pushing the wattage too high before the cotton has had time to soak.
Why coil replacement matters
Your coil is the part doing the hard work. It heats the e-liquid, turns it into vapour, and has the biggest influence on flavour, vapour production, throat hit and overall smoothness. When it starts to wear out, performance drops fast. You may notice muted flavour, a slightly burnt edge, gurgling, leaking, weak vapour, or e-liquid that suddenly tastes wrong even though the bottle is fine.
Some vapers try to stretch a coil for too long to save a few pounds, but that usually backfires. A worn coil can spoil premium e-juice, make the device less satisfying, and in some cases encourage chain vaping because the hit feels weaker. Replacing the coil at the right time gives you better value from both your hardware and your liquid.
How long a coil lasts depends on your setup and habits. Sweet liquids tend to shorten coil life. Higher wattage also wears coils faster. A light MTL user might get well over a week from a coil, while a heavier sub-ohm user running dessert flavours could need a change much sooner. There is no single schedule that fits everyone.
What you need before you start
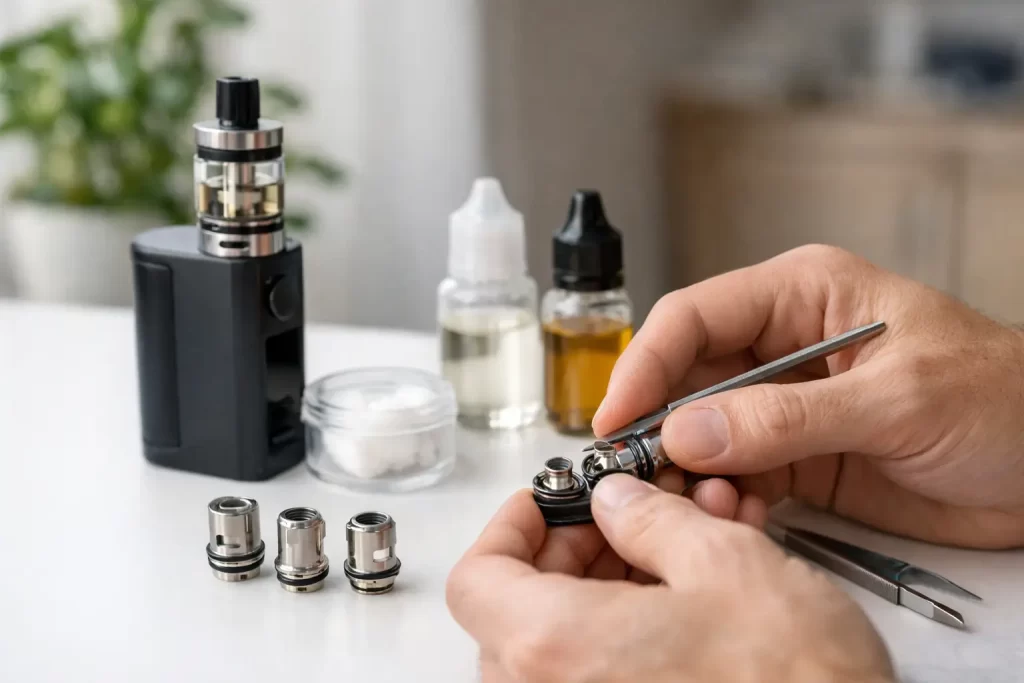
This guide to replacing vape coils at home is simple because you do not need specialist tools. In most cases, you only need your device, the correct replacement coil, your e-liquid, a bit of tissue, and a clean flat surface. If your hands are slippery from liquid, wipe them first. It sounds obvious, but it makes a difference when handling small coil heads and pods.
The most important part is making sure the replacement coil matches your exact device or tank. Coils are not interchangeable just because they look similar. Resistance, fitting style and recommended wattage vary by brand and model. If you are unsure, check the name printed on the old coil or on the packaging. Getting the correct match is half the job.
How to replace a vape coil at home
Start by removing the pod or tank from the device. If there is still e-liquid inside, you may want to empty it first, especially if the tank needs to come apart from the base. Some pod systems let you pull the coil out from the bottom without much mess, while others are cleaner to handle when nearly empty.
Next, take out the old coil. Depending on the device, it will either unscrew or pull out with a firm tug. If it feels stuck, do not force it aggressively. A gentle twist usually helps loosen it. Once removed, check for any excess liquid, dark build-up, or signs of burnt cotton. That gives you a clear idea of why performance dropped.
Before fitting the new coil, prime it. This means adding a few drops of e-liquid directly onto the exposed cotton openings and, if visible, into the centre of the coil. You do not need to drown it. Just enough to moisten the cotton. This step matters because dry cotton can scorch on the first few puffs, and once a coil is burnt, it will not recover.
Now install the new coil. Push it in firmly or screw it in neatly, depending on the design. Make sure it sits straight. A poorly seated coil can cause leaking, poor contact, or inconsistent firing. Reassemble the pod or tank, then refill with e-liquid if needed.
After filling, wait. This is the step impatient vapers skip most often. Give the coil around five to ten minutes so the cotton can saturate fully. If you are using a thicker liquid or a larger sub-ohm coil, it can be worth waiting a little longer. Better to lose ten minutes than ruin a fresh coil in ten seconds.
When you start vaping, begin at the lower end of the coil’s recommended wattage range if your device allows adjustment. Take a few gentle puffs rather than a long hard draw. Then increase gradually until you reach the performance you want. Breaking in a coil properly helps flavour settle and can extend coil life.
Common mistakes that ruin new coils
The biggest mistake is not priming the coil at all. The second is firing it immediately after filling. Both lead to burnt cotton, and that taste is hard to forget.
Another common issue is using too much power too soon. If a coil is rated for a range, start low and work upwards. Going straight to the top setting can overpower a fresh coil before it is ready. This is especially true with mesh coils designed for stronger output.
Chain vaping is another problem. Even a correctly fitted coil needs time to pull more liquid into the cotton between puffs. If you take repeated long draws one after another, the wick can struggle to keep up, particularly with sweet or high-VG liquids.
There is also the simple matter of compatibility. Many leaking and performance complaints come down to using the wrong coil for the pod or tank. Similar brand names and model ranges can catch people out, so always double-check.
Signs your coil needs changing
You do not always need to wait for a fully burnt hit. Usually, the warning signs start earlier. Flavour becomes dull, sweetness turns heavy or strange, vapour drops off, or the draw feels harsher than normal. Sometimes the liquid darkens quickly inside the pod or tank, which can mean the coil is past its best.
Gurgling and minor leaking can also point to a coil issue, though not always. Sometimes that is caused by a loose fit, overfilling, or a worn seal rather than the coil itself. It depends on the device. If a fresh coil and correct fitting solve the problem, you have your answer.
A few practical tips for longer coil life
If you want better value from your consumables, a few habits make a real difference. Keep your tank topped up rather than letting it run nearly dry. Use the wattage range recommended for the coil. Give the device a moment between puffs. And if you switch from a lighter liquid to a very sweet dessert flavour, expect coil life to shorten.
It is also worth cleaning the tank or pod area during coil changes. You do not need to overdo it – a quick wipe with tissue to remove residue is usually enough. Clean contact points and a tidy tank help the device work as it should.
For anyone rotating flavours, remember that a new coil may still carry traces of the previous liquid if the tank has not been cleaned properly. If you are moving from menthol or a strong tobacco to a delicate fruit blend, a quick rinse and dry can save the new flavour from tasting muddled.
When home replacement is easy – and when to ask for help
Most modern devices are designed to make coil changes straightforward. Pod kits and standard tanks from current major brands are generally beginner-friendly, and once you have done it once or twice, it becomes part of routine upkeep.
Still, there are times when getting advice makes sense. If the device keeps leaking after a coil change, if it shows no atomiser or similar error messages, or if you are uncertain about which coil suits your vaping style, it is better to ask than guess. The right replacement does more than fit – it affects how warm, airy, smooth or punchy the vape feels.
At Vape Culture, this is exactly the sort of everyday support adult vapers ask for in store. With so many devices and coil ranges on the market, having the correct match first time saves hassle and keeps your setup running the way it should.
Replacing a coil at home is one of the easiest ways to keep your vape reliable, flavourful and cost-effective. Get the right coil, prime it properly, give it a few minutes, and let the device settle into its best performance. A small bit of care goes a long way – and your e-liquid will taste the way you paid for it to taste.