How to clean a vape tank properly without making a mess
If your vape suddenly tastes dull, slightly burnt, or suspiciously like the last flavour you used three refills ago, the tank usually needs attention. A dirty tank does not just spoil flavour. It can also affect airflow, make routine coil changes less effective, and leave you wondering whether the problem is the liquid, the device, or both.
For most adult vapers, cleaning the tank is one of the simplest ways to keep performance consistent without spending money unnecessarily. It is quick, it helps your e-liquid taste as it should, and it gives you a better idea of when the coil is actually finished and when the tank is simply overdue a rinse.
If you want to know how to clean a vape tank properly, the good news is that you do not need specialist equipment. You just need a little care, the right order, and the common sense not to force parts that are not meant to move.
Why tank cleaning matters more than people think
A vape tank is in constant contact with e-liquid, heat and condensation. Over time, residue builds up on the glass, around the chimney, under the top cap and near the airflow section. Sweet liquids and darker flavours tend to leave more behind, so if you rotate dessert, tobacco or heavily chilled blends, you will usually notice buildup sooner.
That residue changes the way your vape feels. Flavour becomes muddied, fresh liquid tastes contaminated, and the tank can start feeling sticky when you refill it. In some cases, old liquid trapped in awkward corners can also contribute to leaking or gurgling, especially if the tank has been left sitting for a while.
Cleaning also helps when changing flavours. If you move from a strong menthol to a fruit blend, or from a rich custard to a clean tobacco, a quick rinse often makes the difference between enjoying the new bottle and wasting the first tankful.
What you need before you start
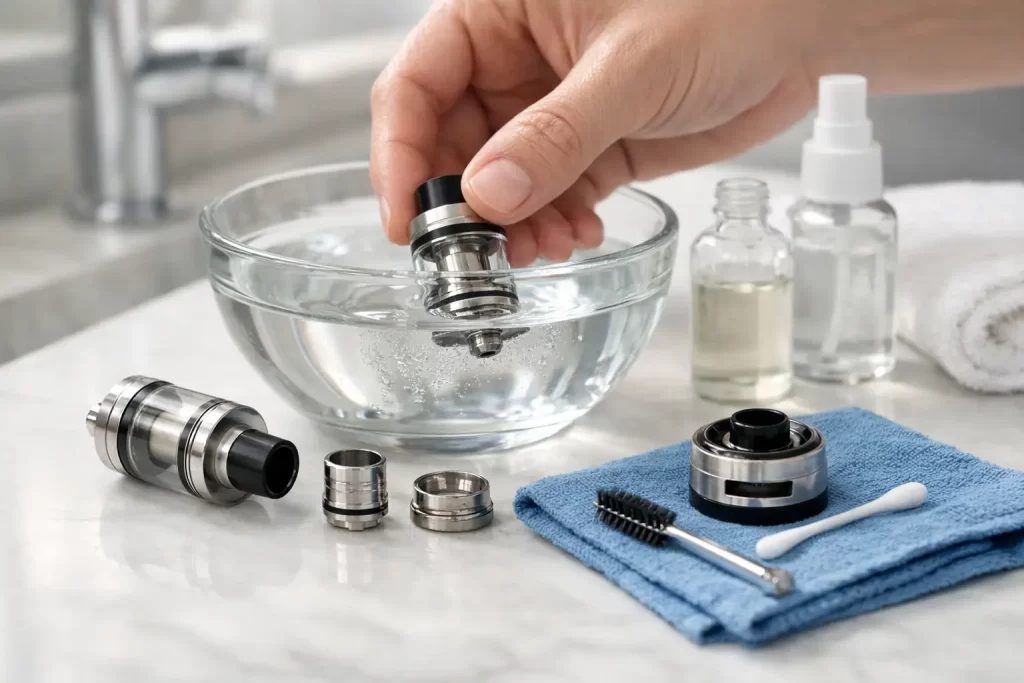
You do not need much. Warm water, paper towel or a clean cloth, and a flat surface are enough for a standard clean. Cotton buds can help with tight areas, especially around threading and airflow slots.
If the tank is particularly grimy, a little washing-up liquid can help, but use it sparingly and rinse thoroughly afterwards. You do not want any soapy taste left behind. Some vapers use high-proof alcohol for stubborn residue, but that is only worth considering for a deep clean and not for every wash. If you do use it, every part must be fully rinsed and completely dry before reassembly.
One thing to avoid is anything abrasive. Do not scrub the glass with rough pads or poke metal tools into seals and O-rings. Tanks from brands such as Geekvape, Vaporesso, Uwell, Voopoo, OXVA and Aspire are made to be maintained, but not attacked.
How to clean a vape tank properly step by step
Start by removing the tank from the device. If there is still e-liquid inside, empty it first. It is tempting to try cleaning around a half-full tank, but it usually turns into a sticky shortcut that creates more mess than it saves.
Next, take the tank apart carefully. Remove the drip tip, open the tank, and separate the glass, base and any other removable sections. Most tanks come apart in a fairly obvious way, but not every part is designed to be forced loose. If something feels stuck, pause and check whether it is threaded, press-fit, or being held by the coil.
The coil should normally be removed before washing. If it is an old coil that is already tasting burnt or weak, bin it and fit a fresh one later. If the coil is still relatively new, keep in mind that washing it rarely restores it properly. A coil is a consumable part, and once it is saturated with old flavour or nearing the end of its life, cleaning the tank helps, but the coil may still need replacing.
Run the non-electrical tank parts under warm water. Warm, not boiling. Boiling water can warp seals or stress delicate parts. Rinse each section until visible liquid residue is gone. If there is stubborn buildup, use your fingers or a soft cloth to loosen it. For harder-to-reach spots, a cotton bud works well.
If needed, place the parts in a bowl of warm water for ten to fifteen minutes. This is especially useful if the tank has dried e-liquid around the threading or under the top cap. A short soak loosens residue without much effort.
For a deeper clean, add a drop or two of washing-up liquid to the water, clean the parts gently, then rinse everything very thoroughly. Any soap left behind will ruin the next fill. If you are switching between very strong flavours, that extra rinse is often worth it.
Once clean, lay every part on paper towel or a clean cloth and let them dry fully. This step matters. Reassembling too soon can leave water trapped in the chimney or airflow, which then thins the first refill of e-liquid and may cause spitting or gurgling.
Drying and reassembling the tank
Air drying is best. You can pat parts dry, but let them sit for a while afterwards so hidden moisture has time to evaporate. Pay special attention to the inside of the chimney, the coil housing area and any airflow channels.
Before you put the tank back together, check the O-rings. If a seal looks torn, twisted or flattened, cleaning alone will not solve future leaking issues. A damaged seal should be replaced if you have a spare.
When reassembling, screw everything together snugly, but do not overtighten. Tanks that are cranked shut too aggressively can become difficult to open later, and over-tightening can also stress threads or seals. Fit a new coil if needed, prime it with a few drops of e-liquid if the coil design allows, then refill the tank and leave it to sit for a few minutes before vaping.
When a quick rinse is enough and when you need a full clean
It depends on how you vape. If you use the same flavour regularly and refill the same tank with similar liquid, a quick rinse every so often may be enough, especially if the tank still performs well.
A full clean makes more sense when you are changing flavour profile completely, replacing a coil after heavy use, dealing with leaking, or picking up a device that has been sitting unused. Tanks left with old liquid inside for days or weeks almost always benefit from a proper strip-down and rinse.
As a rough habit, many vapers clean the tank every one to two weeks. If you use very sweet liquids, you may want to do it more often. If you are running cleaner, simpler blends and changing coils regularly, you might stretch that a bit longer.
Common mistakes that make things worse
The biggest mistake is trying to wash the coil and expecting it to vape like new. In some rebuildable setups there is more room for maintenance, but with standard stock coils, performance loss is usually down to age and residue inside the coil itself. Cleaning the tank helps the system, not the coil miracle.
Another common problem is reassembling while parts are still wet. Even a small amount of leftover water can affect flavour and create odd popping sounds on the first few draws.
Forcing the tank apart is another avoidable issue. If a tank is stuck, e-liquid residue is often acting like glue. A warm rinse and a bit of patience usually work better than brute force.
It is also worth saying that not every issue is a cleaning issue. If the tank still leaks after a proper clean, you may be looking at a worn coil, a bad seal, incorrect wattage, or a filling problem rather than dirt alone.
Keeping your tank cleaner for longer
Good habits make tank cleaning easier. Do not let old liquid sit in the tank for ages if you already know you are switching flavours. Wipe the base and top cap during refills if you see condensation or excess liquid. Replace coils before they are completely spent rather than pushing them too far.
If you rotate between several flavours, having more than one tank or pod in use can save time and preserve flavour quality. That is especially useful for adult vapers who enjoy switching between fruit, tobacco, dessert and menthol without each one bleeding into the next.
If you are unsure whether the tank needs cleaning, a fresh coil and the right liquid match, it is always better to ask before wasting juice and coils. At Vape Culture, that is exactly the kind of practical support people come in for – straight answers, the right hardware, and help keeping your setup performing as it should.
A clean tank will not make a poor setup perfect, but it will help a good one stay good. When flavour is clear, airflow is smooth and every refill tastes like it should, the whole device feels right again.