Good vape maintenance tips don’t have to be complicated. A few simple habits make a genuine difference to flavour quality, device lifespan, and your wallet. Whether you’re new to vaping or you’ve been at it for years, keeping your gear clean and well looked-after is the easiest way to get more out of it. If you’re just getting started, our beginner’s guide to using a vape pen is a good place to build your foundations first.
Why Regular Vape Maintenance Actually Matters
A well-maintained device consistently delivers better flavour, longer coil life, and far fewer dry hits. Neglect it, and you’ll notice the difference quickly: stale residue in the tank, a muted or burnt taste, and a device that feels tired long before it should be.
The honest truth is that neglect is one of the most common reasons vapers replace gear sooner than necessary. It’s rarely the device itself that gives out, it’s the build-up of gunk, the ignored O-ring, the coil that never got primed. A little regular attention keeps all of that from becoming a problem.
Experienced vapers consistently point to two habits that separate those who replace gear every few months from those who get a year or more out of a device: cleaning the tank between flavour changes, and never letting the battery drain completely flat. Neither takes more than a few minutes, but both add up over time.
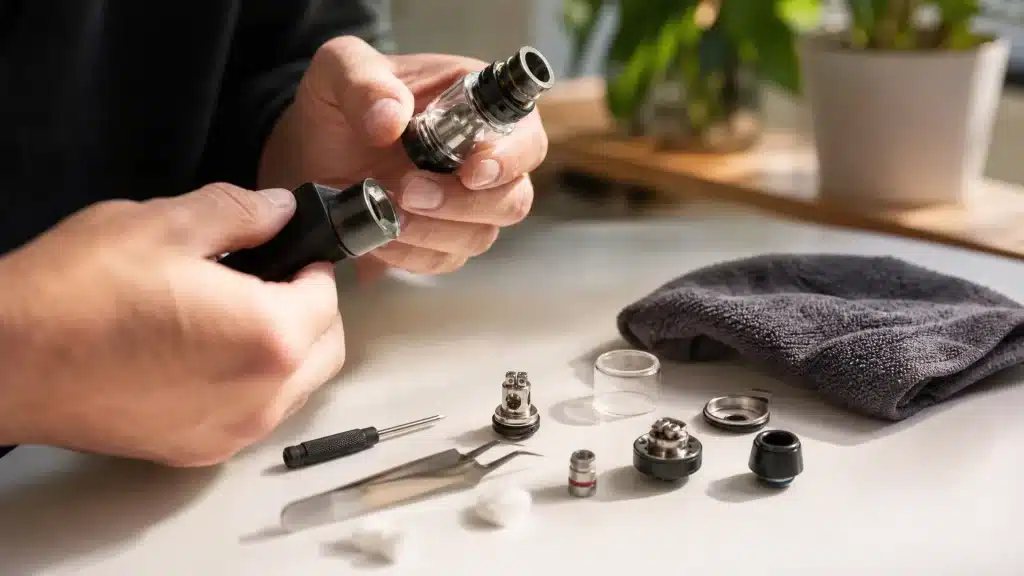
How to Clean a Vape Tank Step by Step
Knowing how to clean a vape tank correctly is the core of good vape maintenance. The good news is it’s straightforward once you know the two-tier approach.
Routine rinse vs. deep clean: when to do each
A routine rinse is what you do between flavour swaps, or roughly once a week if you stick to one flavour. Disassemble the tank, remove the coil, and run each component under warm (not boiling) water. Shake off the excess, then let everything air-dry on a paper towel. That’s it.
A deep clean is for when residue has started to build up, usually every two to four weeks, or any time the tank smells off. For a proper vape tank cleaning soak, place all glass and metal components (not the coil) in a bowl of warm water for 20–30 minutes. If there’s stubborn gunk, a little diluted washing-up liquid works fine. Rinse thoroughly and dry completely.
What you’ll need and what to avoid
You need very little: warm water, a bowl, paper towels, and optionally a small cleaning brush or cotton buds for getting into threads.
Avoid harsh solvents, bleach, or anything alcohol-based on rubber seals. These degrade O-rings over time and cause leaks. Most importantly, let every component dry fully before reassembling. Reassembling a damp tank is a reliable way to cause spitback and leaking.
Vape Coil Care: Getting the Most Out of Every Coil
Vape coil care is where most vapers either save or waste money. Treat a coil right and it can last two to three weeks or longer. Rush it and it’ll burn out within days.
How to prime a new coil properly
Priming, saturating the coil’s cotton wick with e-liquid before first use, is the single most important step for coil longevity. Here’s how to do it:
- Fit the new coil into the tank.
- Add a few drops of e-liquid directly onto the exposed cotton wicking ports on the side of the coil.
- Fill the tank and let it sit for five to ten minutes before taking your first puff.
- Start with a few short, gentle draws before vaping at full power.
At Vape Culture Larnaca, the most common reason customers come in for a new coil ahead of schedule is skipping this priming step. A quick fix that makes a noticeable difference to both flavour and coil life.
Signs your coil needs replacing
The tell-tale signs are easy to spot:
- Burnt or harsh taste, the most obvious sign the cotton is gone
- Reduced vapour production, the coil is no longer heating efficiently
- Dark, gunky residue visible on the coil when you remove it
- Gurgling or flooding that doesn’t clear after cleaning
Dessert and tobacco e-liquids, thick, sweetener-heavy blends, clog coils significantly faster than lighter, fruit-based liquids. Vapers who enjoy these flavours typically need to clean or replace coils more frequently. If you’re curious about what’s popular right now, check out trending e-liquid flavours in 2026 for a sense of what others are choosing.
Smart Storage and Battery Habits to Extend Your Device’s Life
Two areas make the biggest difference when you want to extend vape device life: how you store it, and how you treat the battery.
Storage matters more than most people think, especially here. Leaving a filled tank in a parked car during a Cyprus summer is a classic example of preventable damage. Heat accelerates e-liquid degradation, weakens O-ring seals, and can cause the tank to leak before you’ve even taken a puff. Keep your device out of direct sunlight, away from hot surfaces, and store it upright to stop e-liquid from pooling around the seals.
Battery care is equally straightforward. Don’t leave your device on charge overnight, most lithium batteries degrade faster when held at 100% charge for long periods. Equally, avoid draining the battery to zero regularly, as deep discharge shortens overall battery lifespan. Keep the battery contacts clean and free from e-liquid residue using a dry cotton bud.
These aren’t dramatic steps. They’re just habits. But in a Larnaca summer, they’re the difference between a device that lasts and one that doesn’t.
Vape Troubleshooting: Fixing the Most Common Issues
Most vape problems come down to a small handful of causes. Here’s how to diagnose them quickly.
Leaking tank
Customers who pop in to Vape Culture asking about a leaking tank almost always have the same culprit: a worn or incorrectly seated O-ring. Check the O-rings at every connection point, replace any that look flattened or cracked, and make sure they’re seated properly. Don’t overtighten the tank, snug is enough. Also check you’re filling to the correct level, as overfilling is a frequent cause of leaks. In most cases, it’s an easy fix that means you don’t need a new tank at all.
Burnt taste or weak vapour
A burnt taste almost always means either a dead coil or one that was never primed. Replace the coil and prime it properly before use. Weak vapour with no burnt taste usually points to a low battery or clogged airflow, charge up and check that the airflow slots are clear of residue. If weak vapour persists after charging, the coil may be on its way out regardless.
Build a Simple Weekly Vape Maintenance Routine
The best vape maintenance tips are the ones you’ll actually follow. Here’s a straightforward routine that keeps your gear in good shape without taking over your life.
Daily
- Check battery level and charge before it drops below around 20%
- Store the device upright and away from heat
Weekly
- Rinse the tank with warm water and let it dry fully
- Wipe down the exterior and battery contacts with a dry cloth
- Check O-rings for wear when reassembling
Monthly (or when needed)
- Deep clean the tank with a full soak
- Replace the coil if flavour or vapour quality has dropped
- Inspect the mouthpiece and airflow vents for blockages
Staying on top of these small tasks is what separates a device that lasts from one that doesn’t. If you need to pick up a fresh coil in Larnaca or grab any vape accessories available in Larnaca, the team at Vape Culture are happy to point you in the right direction. If something’s not working as it should, bring it in, half the time it’s a two-minute fix. If you’re also thinking about the best vape devices available in Larnaca for long-term reliability, we can walk you through what’s worth investing in. And if you know someone who’s only just starting out, send them our way, getting started with vaping in Larnaca is easier than most people think.